

This simple interrupted guide is written by Dr. David Naysmith. Dr. Naysmith has decades of experience as a plastic surgeon and Assistant Clinical Professor at the University of British Columbia.
NOTE: This simple interrupted suture tutorial assumes that you have read the following guides and practiced the principles:
This simple interrupted guide is an excerpt from our complete online suturing course. The suture pad and kit used in the images and video is our corresponding suture practice kit. Click the links below to learn more:
PLACING A SIMPLE INTERRUPTED STITCH
TABLE OF CONTENTS
- Goals for placing a simple interrupted suture
- Instruments and supplies required
- Optimum wound cleaning
GOALS FOR PLACING A SIMPLE INTERRUPTED STITCH
The goals of placing a simple interrupted suture are:
- Would closure
- Minimal damage to would edges (skin, fascia, etc.)
- Slight eversion of the wound edges
INSTRUMENTS AND SUPPLIES REQUIRED
- Needle driver (aka needle holder)
- Scissors
- A suture on a curved needle
(A larger needle will be easier to learn with but any size can be used. And, use a 3-0 or 4-0 suture material.) - An artificial skin substitute
(Pictured below is the suture pad from the Suture Mentor Suture Kit). However, you can also use some heavy felt or the old standby – an orange or banana skin. - A toothed forceps

Figure 1
OPTIMUM WOUND CLEANING
First, a word about OPTIMUM WOUND HEALING.
When closing wounds we want to create the best possible result in terms of having wounds heal quickly, with the best possible scar and with the fewest complications. To do so there are some things we strive for as we start closing.
These include:
- Obliterate all deep potential dead space

Figure 2
The term DEAD SPACE refers to areas in the depth of the wound that have not been brought together with sutures and can accumulate blood or serum. These are collections that can become a nidus of infection and are weak in terms of wound healing. For more information on this and how to avoid this, go to the Suture Mentor Suturing Program/kit.
Note: for most simple skin closure this will not be an issue.
- Minimize tension on the skin closure.
This is accomplished by taking any tension on wound closure with deep sutures, either in the fascia or the deep dermis -using deep sutures with buried knots. Again, for more information on this go to the Suture Mentor SuturingProgram/kit.
Note: for most simple skin closure this will not be required.
- Create slight eversion of the skin edge.
This is important so we need to define exactly what is meant by EVERSION.
Figure 3
Note that the ideal way the skin edges come together is to have the edges mound up slightly. This allows for good contact between the dermis on both sides of the wound and for good alignment of the epidermis. This is our goal for skin closure.
The opposite of this is INVERSION of the skin edges – and this creates poor wound healing and poor scars. See fig 4. Inversion puts keratinized epithelium against keratinized epithelium and there is no healing between these two layers. So, our efforts when suturing skin will be directed to – “How do I get the edges to evert?"
Figure 4
- Finally, we want the skin edges that we bring together to match. By that we mean that each of the layers of skin should come together with its counterpart from the other side – Fig.3 epidermis to epidermis, dermis to dermis, fat to fat, fascia to fascia, so there are no step deformities see - Fig. 5

Figure 5
HOW TO HOLD THE NEEDLE
So, what am I supposed to do with the needle on the end of that piece of thread?
This is a great question and one that should be answered early as knowing how the needle is constructed and how to use it will diminish your frustration significantly.  Figure 6
Most needles used for suturing are curved – some short, some long, some sharp point, some cutting point. (For details go to Suture Mentor.)
Almost all sutures are now swaged onto the needle. That means the suture material fits smoothly into the non-working end of the needle (and eyed needle is the other kind and these went out with the Dodo bird). The swaged end is round. The remainder of the needle, the body, is flat.
Why is this important? If you place the needle driver jaws on the round part of the needle one of two, or possibly both will happen: the needle will rotate in the jaws of the driver – this is very frustrating.

Figure 7

Figure 8
(Place the jaws on the swaged bit of the needle and push it with your finger – it rotates! Fig. 7 and 8.) The other thing that can/will happen is that you will bend the needle when driving it through tissue equally frustrating and poor form. Fig. 9

Figure 9
So, how do you pick up and hold the needle properly?
It all starts with the suture packaging!

Figure 10
Fig. 10. To open the suture and keep it sterile, grab the “wings” on the end of the package and pull them apart to expose the suture in its holder.

Figure 11
Fig. 11. Note the placement of the needle in the package. This is not coincidence. The needle is positioned so you can pick it up with the driver and grasp it on the flat of the needle just below the round swaged bit. This is what I called the 2/3 : 1/3 rule. 2/3s of the needle is available to go through tissue and the needle will not rotate or bend (unless you are very rough with it !). Fig. 12 and 13.
Figure 12

Figure 13
By the way, why don’t we grab it closer to the working end?
Because there isn’t enough needle sticking out when you place it in tissue and you can’t find the needle to pull it through! This is really frustrating. Fig. 14

Figure 14
Finally, it is time to actually place a simple, interrupted stitch!
This can either be done as a single pass of the needle, or with two passes of the needle – depending on how experienced you are and how far apart the wound edges are. Since the two pass technique is the easiest and can be used for any situation, let us start with it.
Remember, the goal is to end up with the tissue edges aligned, together with gentle tension and most importantly, edges everted. So, how do we get eversion?
With the needle in the driver with the 2/3:1/3 rule, rotate the wrist so the needle approaches the skin at ninety degrees.

Figure 15

Figure 16
Fig 15 and 16. (I have exaggerated it a little in this photo so you will understand what I mean be rotating the wrist). This will allow the needle to grab a lot of deep tissue.

Figure 17
Drive the needle through the skin by rotating the needle in the arc of its curve Fig. 17.

Figure 18
This will bring the needle tip into the depth of the wound. Fig 18.

Figure 19

Figure 20
Pull the needle through and reload on the driver. (remembering the 2/3:1/3 rule) Fig. 19 and 20.
We are now ready to make the second pass. Whatever depth the needle came out of the tissues on the first side – that is the depth where it should enter the deep tissue on the second side Fig. 21. This is the key to getting the tissue to align.

Figure 21
Using the curve of the needle pick up the same amount of deep tissue as you did on the first side Fig. 22.

Figure 22
This is the key to getting the skin edges to evert Fig. 23.
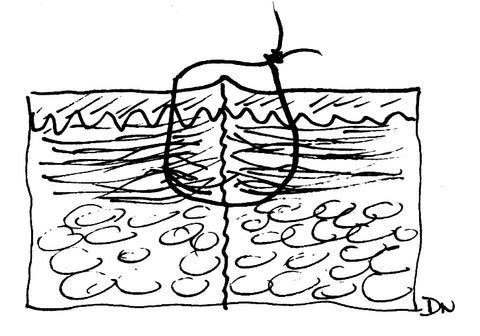
Figure 23
Pull the needle through and you are ready to tie the knot. Fig 24 25 and 26.

Figure 24

Figure 25

Figure 26
That is it! As is demonstrated in the photos, you can use the toothed forceps to hold the skin edges and evert them slightly which helps to get a good “bite” of deep tissue.
For details on: how long to cut the stitch ends, how to lock the first throw and adjust the skin edges, how and when to remove sutures, how close together should stitches be placed, and tips on making all of this easier – see Suture Mentor Course/Kit.
What about placing the stitch with a SINGLE PASS?
In order for this to work there need to be a few things present:
- The needle should have a long “working” length. Small short needles don’t work well. It is difficult to get all of the tissue on both sides of the wound on the needle.
- The wound edges should be very close together, if not actually touching. (This is often accomplished by placing deep sutures to take tension.)
Remember, you still have to capture more tissue in the depth on both sides so the edges will evert. This is ensured by rotating the wrist back, entering and exiting the skin at ninety degrees, and working with the curve of the needle. See Fig. 27, 28, 24, 25, and 26.

Figure 27

Figure 28
Note: When grabbing the needle and pulling it through, do not pick up the needle by the tip – with either the forceps or the needle driver. If the tip gets bent or broken off you will not be able to use the needle again. When placing a stitch with a single pass there is sometimes a tendency to do this because there is so much tissue on the needle. You can be close to the tip but not on the point or the cutting surface.
Have fun !
====================================
How to Perform a Simple Interrupted Suture Video
In this video, Dr. Naysmith covers how to perform a simple interrupted stitch.
Do you need a suture practice kit to practice? Purchase the suture practice kit used in the video. This is a clip from our suturing course. Purchase the full Suturing in 7 Days Course.
The simple interrupted stitch is foundational for suturing. It can be used to close almost any wound. If you ever get into trouble with wound closure always go back to the simple interrupted.
Why is the simple interrupted suture so important? Is the foundation for many other of the stitches that we will place including vertical mattresses and horizontal mattresses.
For most people, 90 percent of the wound closure you will do will be a simple interrupted stitch.
Simple Interrupted Suture Video Transcript
The simple interrupted stitch: we've been waiting for this for some time. This is the one that can be used to close almost any wound, and the thing I'd like you to remember is, if you ever get into trouble with wound closure, always go back to the simple interrupted.
As well, it's the foundation for many other stitches that we will place. Vertical mattresses, horizontal mattresses, are all based on this, and ninety percent of the wound closure you will do will probably be a simple interrupted stitch.
Here's an example of how to place a simple interrupted stitch: pop it through. We're going to go through both sides at once. I've turned the edge back, so get that 90-degree penetration, tie a square knot. Just have the edges kiss together and no more than that. We don't want to crush these.
Then bring the scissors in, cut just shorter than the stitches are being placed apart.
Now, some things to remember about the simple interrupted stitch: when we go to place it, we want to have 90 degrees of penetration of that needle. So we've rolled this right back, we're holding the forceps in a pen grip, not a CSI grip if you please. And look at the finger rests we have down to support the hands so they're stable. Grab the needle at the two-thirds, one-third mark so we don't bend it on the way through.
And the goal is eversion of the wound edges. We want them to pop up just a little bit. This is very, very important for a good scar. So the question comes up: how do I make this happen?
Well, it's pretty simple. What we want to do is when we pass that needle through the deep tissues, in order to get eversion, we have to grab a bigger piece in the depth in terms of width than we do near the surface, and so we use a curve of the needle to do that and we grab with this trajectory of the needle through the tissues. If you do that, when you tie it, the edges will just evert out slightly.
So let's look at achieving eversion on the left-hand side. Here we're going to get eversion; we've picked up a deeper bit of tissue. We do this by rolling the wrist back. Now I've exaggerated this, and you'll see people not doing this quite so much, but what they've done is they've rolled the needle back in another way to get 90-degree penetration of the skin when we pop it in and coming out the other side. We want 90-degree penetration; we do this; we will get eversion.
This is what we're aiming for. If you get lazy and you don't roll the wrist back, you come in tangential to the skin surface, you will take a narrow bite in the depth, and you'll have a wide bite of the surface. This ultimately leads to inversion of the wound edges, rather than eversion.
This is really not what we want to see. It leads to poor scarring and, to some degree, weak wounds. I cannot stress this enough; this is critical for good results.
Because this is so important, let's look at this in a step-by-step fashion:
First of all, support the hands well, rotate the needle back; in this case, it's a palm grip that's rotating that back so the wrist doesn't appear to be back but it's rotated in the hand. Pop it through; come through. Use a curve of the needle and rotate it through, so you come through 90 degrees on the other side.
As you pull it through, we use what we call the curve of the needle. If you do so, you will not bend needles. Tie a square knot, and the edges will evert if you have good tissue depth.
Now, there are some options when we come to do this as to how we place this stitch, and the first option is that you can use one pass of the needle through both sides, as I just showed you, and here you can do this if the wound edges are close together and there's really no tension on the wound, and you have to have a large enough needle so the working end of the needle will go through both sides at one time. So when we do this, we make one pass that goes all the way through both sides, tie this, and we'll get eversion as long as we've had good thickness in the depth.
The other option is to separate the passes for each side, and here we would do this if the wound edges are apart, there's a little bit more tension, or if you have a short needle and you actually can't get it through both pieces of tissue. Now, always default to two passes if you have any question whatsoever about how to do this. It's an easy way to get the wound edges to come up and to make sure you're in the same depth on both sides. So here, what we do is we pass the needle through one side, we then re-grab the needle with the needle driver, go back into the depth of the wound, taking care to pick up exactly the same depth on both sides in the depth of the wound here.
And here we want to avoid a step deformity. When we tie this, the wound everts, and again, default to this if you have any questions.
So first of all, let's have an example of going all the way through. We're popping all the way through with this one, got nice bites on both sides. Pull the stitch through until you have a relatively short end. Surgeon's knot, two spins on the first one, and look how little tension there is on wound closure. We just have the edges kissing together.
Now, the other is the two-pass. Here, we pass it on one side, we re-grab, we go in, and what we're going to do is you'll see the wrist roll back, and we turn the skin edge back, so we come through at 90 degrees, very important. And as we tie this one, the wound edges will come together beautifully. Surgeon's knot, lay it down flat, there it is, and now the second pass. You'll see the square knot forming. There it is, and again, just enough tension to have those edges kissed together.
Okay, I hope I've made it clear enough that really the bottom line in sewing with an interrupted stitch is eversion of the wound edges.
In preparation for putting our first interrupted stitch in, we need to use the artificial skin surface, and I want you to make a cut in it. So load the scalpel blade, make a cut, and make sure it goes through the epidermis, which is the pink layer, and the dermis, which is that little red layer you can see, and into the fat, which is the foam. Take your stitch, which you've picked up with the two-thirds, one-third roll, use the pen grip for the forceps, roll your wrist back, you want that needle penetrating at 90 degrees, and then we're going to make one pass. We're going to come through one side only here, and we push it through, grab, and again, the two-thirds, one-third rule. Now lift the edge on the other side; we're going to put the needle in at the same depth that we came out on the one side; we're going to pop it in and push it through. Look how we work with the curve of the needle. We turn with the curve of the needle. Leave one end short. We then lay the thing on. We're going to do a surgeon's knot, so we go around twice, grab the free end, cross the hands, lay down the first knot. Now, look, we're in perfect position underneath. We reach over and grab; we lay the second knot. We've got a square knot. We're going to come back again, lay it across pointing at the hand, go over and pick up the free end, lay it down.
Now, we're going to pick up the scissors, cut the stitch. That's our first interrupted stitch. The second one that we're going to place, we're going to place by going through both sides at the same time. You can do this if the wound edges are close together. Again, roll the wrist back 90 degrees. In come through, and I'm just using the forceps to push the tissue down so we get a 90-degree puncture on this side as well. Lift, try and grab the two-thirds, one-third so you're ready to go again, and then we tie. Surgeon's knot, once, twice, reach down and grab, cross the hands, lay it flat. We're in perfect position to put the second throw on, or under the stitch. Reach over, pull it through and down the last throw. Point at the hand, reach over and grab.
So we've just placed the second one by passing through both sides at the same time, rather than individual, and you can do this if the wound edges are close. We'll now do one at a little bit more regular speed. So we come in, 90-degree puncture, we're going to go across both sides, same depth on each side, pop it through, 90 degrees, pick it up with the forceps, pull it through, keep a short end. Surgeon's knot, cross the hands, lay a square knot, third knot, fourth knot, and scissors in to cut the stitch.
Leave a comment
All comments are moderated before being published.
This site is protected by hCaptcha and the hCaptcha Privacy Policy and Terms of Service apply.